Thursday, December 21, 2017

Romare Bearden Inspired 'My Block' Cityscape Collage

4th grade artists looked at the work of an African American artist named Romare Bearden to inspire their own work. Bearden lived and worked in Harlem, a neighborhood in New York City. We looked at and discussed one of his collage artworks called "The Block." 
Romare Bearden, The Block (1978) 
Students noticed that there were many different buildings and details -- windows, people, signs, etc. Students also noticed that some of the buildings looked like they were made of different materials. We discussed how the street in a city is very busy, with many different kinds of buildings, such as apartments, restaurants, and stores. Although you can tell that it is a city street, some of the colors, proportions, and views are not completely realistic. For example, some parts of the buildings are cut out so that you can see what is happening inside, and the light bulb in one of the rooms is much larger than the people around it. The longer we looked at it, the more there was to see! 
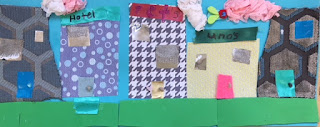
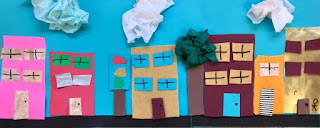
Then we began our own mixed media collage artwork, using a long piece of construction paper to start the city street. There were many different materials to choose from, including construction paper, corrugated paper, metallic paper, fabric, felt, tissue paper and foam. Many students began with a road and added buildings on top, overlapping different shapes and materials. 
Students added other details to their street, such as traffic lights, stop signs and pets. After they were done with their mixed media collage, students used a skinny Sharpie to add details such as window frames and signs. Below are some examples of our finished collage city streets, inspired by Romare Bearden.
Maria, 4th Grade (Mattson)
Aysha, 4th Grade (Doherty)
Connor, 4th Grade (Doherty)
Kingston, 4th Grade (Doherty)
Mackenzie, 4th Grade (Doherty)
Mayck, 4th Grade (Doherty)
Stefano, 4th Grade (Graves Pelletier)
Tamia, 4th Grade (Graves Pelletier)
Lily L., 4th Grade (Mattson)
Yensi, 4th Grade (Cikacz)
Mara, 4th Grade (Cikacz)
Michael, 4th Grade (Cikacz)
Vana, 4th Grade (Cikacz)

Friday, December 15, 2017

Owl Babies Collage

After listening to the story Owl Babies, by Martin Waddell, PK artists in Ms. Mattson's class made owl collages uses torn paper. First we listened to the story and shared what we knew about owls, such as the fact that owls are nocturnal animals that hunt at night.
We started by tracing the shape of an owl, and then we ripped up some construction paper and glued the pieces inside the body of the owl. We added eyes using circles and a beak using a triangle, as well as feet. Then students used crayons to add a background, such as a tree branch like the branch the baby owls sit on while waiting for their mother, or their home in the tree trunk. Below are some examples of our owl collages:
Adrian, PK (Mattson)
Claire, PK (Mattson)
Des, PK (Mattson)
Devon, PK (Mattson)
Evelyn, PK (Mattson)
Margot, PK (Mattson)
Shemi, PK (Mattson)

Tuesday, December 12, 2017

Pop Art Printing, Part 2

4th grade artists printed their Pop Art inspired plates, which they made after learning about the Pop Art movement and artist Andy Warhol. On the first day of printing, we learned about the printmaking process and the steps involved. Students pulled their first prints, using yellow ink on purple paper, to get a feel for how much ink is appropriate and how long to roll it out with the brayer. 
We set up our tables with a bench hook and brayer to roll out ink. Everyone folded a piece of manila paper so that there was a clean side and a messy side. We rolled out the ink using the brayer, listening for a sticky sound that told us that the ink was evenly spread out and ready. We placed the plate on top of the messy side of our manila paper and rolled the ink on top of our plate carefully. We moved it to the clean side and pressed a piece of colored paper on top. 
Using our hands to gently rub, we then flipped the paper and over and pulled it apart from the plate to reveal their print. For their second printmaking class, students were able to choose their own color of ink and paper. Students made multiple copies with their plate, which the printmaking process allows us to do. 
On the third printing day, students created prints using two colors of ink to do a rainbow roll. Using two different colors that met in the middle to form a new color, the rainbow roll gave the prints a gradation effect. Many students enjoyed this effect and their prints from this day. After our printing classes, students selected our three best prints and mounted them on a black background. Since we had done printmaking for three classes, students had many prints to choose from! 
Students thought about which prints came out the most successfully, looking at the amount of ink, and also tried to display different color combinations. Students arranged them in an order before gluing them down. After gluing down their three prints, students signed and titled their work. Many students asked each other for advice and also helped each other brainstorm creative titles! 
We did a gallery walk, so we could see everyone's finished work. Students noticed that there were some very popular subjects that came up often, such as Pokemon and Instagram, but everyone's prints looked different. Many students appreciated the thoughtful and clever titles that their friends were able to come up with, as well! 
Students also did a turn and talk with a partner, using their fortune tellers, to share and reflect on their work. Students shared with each other what they were most proud of about their work, as well as something that was challenging and what they might have done differently or changed. Many students were proud of their color choices, the pop culture object they selected, and the way their prints came out, especially the ones using multiple colors. The most challenging part for many students was using the stylus to press into the foam to make their plate and rolling out the right amount of ink when printing. 
Below are some examples of our finished Pop Art prints, inspired by Andy Warhol. As you can see, students did an amazing job mounting their own work! Some prints are also on display now in the glass case in the lobby.
Ben, 4th Grade (Doherty)
Valentina, 4th Grade (Doherty)
Lily F., 4th Grade (Graves Pelletier)
Toba, 4th Grade(Graves Pelletier)
Evan, 4th Grade (Mattson)
Emily, 4th Grade (Mattson)
Sam, 4th Grade (Mattson)
Pedro, 4th Grade (Cikacz)
Yulissa, 4th Grade (Cikacz)
Lory, 4th Grade (Cikacz)

Monday, December 4, 2017

Arts Around the World: Hojalata Folk Art from Mexico

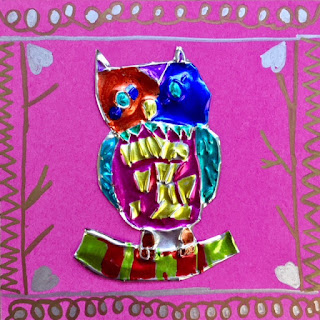
The first country on our Arts Around the World journey this year is Mexico. Our first project focused on Día de Muertos or Day of the Dead, a holiday celebrated in Mexico. For our second project, we focused on the folk art of Mexico, specifically from the Oaxaca region. Folk art is popular art forms that have been passed down through the generations. We looked at one particular form of folk art called hojalata ("oh-ha-la-ta") art, or tin art. 
Folk artists use tin to create these artworks, cutting and shaping the tin and using different techniques, like embossing, to create patterns and designs on the metal. Artists then add lacquer or enamel on the tin in bright colors. After looking at examples of hojalata art, students created sketches of different animals from Mexico. 
Using reference images, students brainstormed a few different ideas before choosing one for their final artwork. The following class, students learned about embossing, which is a technique where you carve, mold or stamp a design on a surface, like paper or metal, so that it stands out in relief. The two materials typically used for embossing are paper and metal. Metal embossing is used to put a design on metal sheets. 
The metal is pushed with an embossing tool or stylus to create a raised effect on the opposite side. Students taped their design on top of an aluminum sheet, so it would not move around. Then they placed this on top of a piece of felt, which provided a softer surface to work on. Using a wooden stylus, students pressed down on all their drawn lines. 
Students were amazed to see their lines coming through, creating a bumpy raised design on the opposite side of the metal sheet! After they went over all their lines once, they removed the paper on top and went over all their lines again with a blunt pencil. This creates a bumpy texture that you can see on both sides of the metal, but we used the side where the lines were raised. 
After students were done embossing, they used colored Sharpie markers to color in the areas in between the raised lines of their design. The lines created borders for their shapes, and we discussed color choice and how to use complementary colors to help their designs and patterns stand out. The final step involved getting the metal hot glued to a background color, creating a frame for their work. 
To share our finished work with each other, we did a turn and talk using our fortune tellers. Students picked partners and used their fortune tellers to ask each other questions about their work. We also did a gallery walk, where we walked around the room to see everyone's work. Below are some examples of our finished embossed hojalata artworks:
Alex, 2nd Grade (Hinds)
Andy, 2nd Grade (Pearse)
Ava, 2nd Grade (Hinds)
Kaiwan, 2nd Grade (Hinds)
Lucas, 2nd Grade (Pearse)
Manha, 2nd Grade (O'Connor)
Mariana, 2nd Grade (Stone)
Ruken, 2nd Grade (O'Connor)
Sarah, 2nd Grade (Stone)
Shane, 2nd Grade (Pearse)
Stephanie, 2nd Grade (Pearse)