Thursday, May 31, 2018

Ice Cream Papier Mache Sculptures

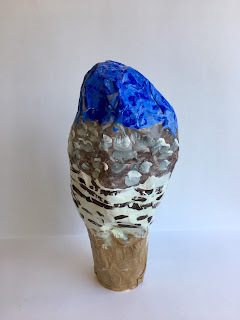
In keeping with the warmer weather, 4th grade artists recently created papier mache ice cream cones! We began by creating the armature, or base structure, of our papier mache cones. We discussed how buildings often start with a foundation and steel beams that help give it shape and support. An armature helps support a sculpture or 3D artwork from the inside, much like the foundation and steel beams in a skyscraper. It also functions like the skeleton in our bodies, helping the work to stand.
First, we filled our paper cups with newspaper so that they would not fall over. We talked about how, when building something that stands up, it is important for the base to be heavier and sturdy, to support the weight of materials that go on top -- like when you are building a snowman. Then students balled up more newspaper, wrapping masking tape around the "scoops" to secure them to the paper cup "cone." 
The next class, students learned how to papier mache, using art paste that is clear and thick consistency. We took a little of the art paste to coat our palms, then took strips of newspaper and rubbed them in between our hands. This kept the paste from dripping everywhere and allowed the strips to get fully coated. Each piece of newspaper was applied to the armature and layered on top of each other to fully cover the cone and scoops. 
Next class, we added additional papier mache layers. We used white paper for the ice cream scoops and brown paper towel for the cone, so they would be easier to paint without the newspaper showing through. 
The following class, students used their knowledge of color mixing to paint their ice cream cone scoops. Students were encouraged to paint each scoop a different color and paint the base layer first. Many students used white to make lighter colors called tints. We mixed a variety of different colors to create different flavors, including mint chocolate chip, strawberry, coffee, chocolate, cookies and cream and rainbow! 
After the first layers of paint had dried, students added details like toppings, sprinkles, and hot fudge on top. Some students also painted the cone a darker brown, or painted lines on top to make waffle cones. The last step was to cover the entire ice cream cone with a clear varnish called Mod Podge, to help seal the paint. Here are some examples of our colorful ice cream cones:
Andrew, 4th Grade (Cikacz)
Ariana, 4th Grade (Graves Pelletier)
Arianne, 4th Grade (Doherty)
Brixton, 4th Grade (Mattson)
Connor, 4th Grade (Doherty)
Destanie, 4th Grade (Cikacz)
Gustavo, 4th Grade (Doherty)
Holly, 4th Grade (Cikacz)
Jackie, 4th Grade (Cikacz)
Lamar, 4th Grade (Doherty)
Marina, 4th Grade (Mattson)
Marissa, 4th Grade (Graves Pelletier)
Maya, 4th Grade (Graves Pelletier)
Pamela, 4th Grade (Graves Pelletier)
Priya, 4th Grade (Graves Pelletier)
Sarah, 4th Grade (Cikacz) 
Sofia, 4th Grade (Mattson)

Tuesday, May 22, 2018

Texture Printing

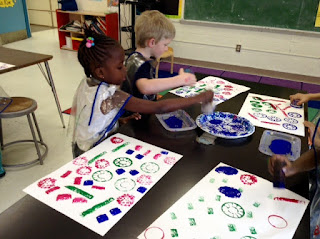
Recently, PK and Kindergarten artists have been exploring texture, or how something feels to touch, through texture printing. We have already printed with cardboard earlier this school year, in our printed cityscapes. This time, students tried printing with a variety of different everyday objects and materials, as well as different colors of paint! 
First, we reviewed how we make a print with an object: dip it in the paint, press it down on the paper, and lift up to reveal the print. We talked about how to leave some space on the paper, so that there would be enough room to visit all 6 different color stations. Then students started printing at their assigned table, with one color of paint. Every few minutes, students moved to another table with their group to print with different materials and colors. 
Objects included sponges, bubble wrap, cardboard paper rolls, plastic mesh, and various plastic caps and lids. Prints were layered on top of each other as students moved around the room. Students were encouraged to explore and experiment with their prints and use the entire paper. 
PK and Kindergarten students did a great job with this messy process, making sure to put their objects back in the center of the table for others to share and walking carefully to the next station with their artwork when it was time to switch. It was messy, but also a lot of fun! Here are some examples of our texture printing exploration works on display:
Amor, Kindergarten (Beatty)
Giannah, Kindergarten (Bolton)
Inty, Kindergarten (Tan)
Kaylie, Kindergarten (Blackwood)
Lily, PK (Mattson / Gendren)
Nico, Kindergarten (Segreve)
Nora, Kindergarten (Segreve)
Olivia, Kindergarten (Blackwood)

Tuesday, May 15, 2018

Monoprinting Explorations with Gelli Plates

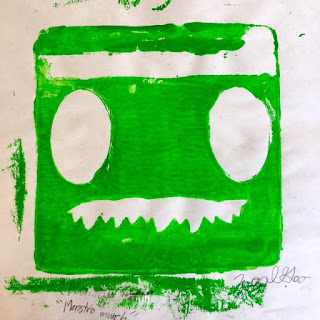
This spring, 3rd grade artists experimented with monoprinting using Gelli plates. Gelli plates look and feel a lot like gelatin, but are reusable (and not edible!). We learned that in monoprinting, you make a one of a kind print, unlike other forms of printmaking, where you can print the same image multiple times. We explored a few different monoprinting techniques, focusing on one technique per class. 
On the first class, we learned about the subtractive method of monoprinting. Students connected this technique to subtraction in math, which means to remove or take away. Students watched a demonstration before trying it themselves. First, we rolled acrylic paint on top of the Gelli plate in an even layer with a brayer. Using cotton swabs, we removed, or subtracted, some of the paint from the plate before placing a piece of paper on top and pulling the print. We used them because we cannot use anything sharp on the Gelli plate's surface. Students experimented with different lines, shapes and symbols. We also noticed that everything we drew onto the plate came out backwards on the paper. The Gelli plates made monoprinting pretty easy! After each print, we used the brayers to roll more paint on top of the plate and start again. Each student made 3 subtractive monoprints, sharing a Gelli plate and brayer with a partner. At the end of class, one student washed the brayer and the other partner cleaned the Gelli plate. The Gelli plates are easy to clean with a little hand sanitizer and paper towel. 
The following class, we learned about and experimented with the additive method of monoprinting. The opposite of the subtractive technique, we added the paint directly on top of the Gelli plate. Students used paintbrushes to paint lines, shapes and designs on top of the plate before placing a piece of paper on top and pulling the print. We used scrap newsprint paper to remove any remaining paint between prints. Each student made 3 additive monoprints and shared the clean up responsibilities at the end of class. 
The third technique we learned about was masking. Masking is when you cover up part of the plate with a material so that it masks that area. We used paper shapes to cover up parts of the Gelli plate. 
We also experimented with layering as our fourth and final technique, printing on top of existing prints. For this technique, we also had to register, or line up our prints, with the one already on the paper. This was challenging, but we noticed that layering our prints together created some very interesting effects and new color combinations. 
After all of our monoprinting explorations, we looked at all of our prints and selected our three favorites to sign and title. Students had as many as 15 prints that they had made during all of our explorations! It was interesting to see prints we had made several classes ago. Students created a unique signature to sign all their prints and also spent time coming up with thoughtful and creative titles! 
We finished with a gallery walk to see everyone's favorite three prints, spending time to notice the monoprinting technique(s) that were used and reading the titles. Our creative titles added a lot to our understanding of the prints. Below are some examples of our monoprints:
Anastasia, 3rd Grade (Monfette)
Autumn, 3rd Grade (Monfette)
Boran, 3rd Grade (DeBaie Nickl)
Brian, 3rd Grade (Donato)
Charlotte, 3rd Grade (Fletcher)
Daria, 3rd Grade (Fletcher)
Ella, 3rd Grade (DeBaie Nickl)
Ellian, 3rd Grade (Monfette)
Mera, 3rd Grade (Donato)
Sophia, 3rd Grade (Monfette)
Viveca, 3rd Grade (Monfette)
Zaol, 3rd Grade (Monfette)