Thursday, May 7, 2015

Abstract Cubist Style Self Portraits

After having drawn their self portraits from observation, using mirrors, 3rd grade artists looked at portraits painted by other artists, including Vincent van Gogh and Pablo Picasso
Pablo Picasso, Self Portrait (1907)
We noticed that while both artists painted self portraits, Picasso's looked a little different. Students noticed that his self portrait had a lot of sharp lines and angles, his features looked exaggerated and too big for his face, and the colors were not as carefully mixed or painted.
Pablo Picasso, Portrait of Dora Maar (1937)
We looked at some other portraits by Picasso and made similar observations. We also noticed that the eyes faced in different directions! One looked like it was looking forward and the other from the side profile view. Picasso also used colors that were not very realistic, as they are so bright, and sometimes he used more than one color to paint the same area.

Students learned about Cubism, an art movement developed by Picasso and Georges Braque. In Cubism, artists looked at the world in different ways. They would break up the subject into many different shapes and look at it from different angles. 

Students then began their own Cubism inspired self portraits, which started off similarly to our self portraits from observation, with a head, neck and shoulders. However, students could take more liberty with their shapes and colors. Using oil pastels, students colored in their hair and top, but left their faces blank.
Next class, students used different colored pieces of paper to add their facial features, considering how they could make them abstract and different from the way they might normally approach them. We experimented with making one eye look forward and the other look sideways, and students used many different colors and techniques with their oil pastels.
After arranging the pieces around the face, students glued them down and added a background, considering color and pattern in an abstract way. Here are some of examples of creative Cubist style self portraits!
Giovanna, 3rd Grade
Alec, 3rd Grade
Katherine, 3rd Grade
Anon, 3rd Grade
Tracy, 3rd Grade
Sidney, 3rd Grade
Elena, 3rd Grade

Monday, May 4, 2015

First Grade Self Portraits

1st grade artists drew their self portrait from observation recently, using the new standing mirrors gifted by the PTO! We discussed how our faces and features are all different from each other and so students worked hard to look at their own faces in the mirror to capture their individuality. 
Students began with their face shape, neck and shoulders, since that is all you can see in the mirror. We focused on the shape of the eyes, nose and mouth as being different from how you might draw a cartoon face. Instead, students were challenged to look closely at their own eyes, noses, and mouths and use shapes and lines to represent them.
After drawing their self portrait, students used crayons to color them in and add a background, either what they saw behind them in the mirror or imaginary. These are some examples:
Amaia, 1st Grade
Ben S., 1st Grade
Billy, 1st Grade
Lia, 1st Grade
Diya, 1st Grade
Edmond, 1st Grade
Gabriela, 1st Grade
Manos, 1st Grade

Wednesday, April 29, 2015

Louise Nevelson Inspired Assemblages

PK and Kindergarten artists have been exploring texture this past month, through texture rubbing and texture printing. This week, we learned about the artist Louise Nevelson and how she made artwork from materials she found. Nevelson used objects that she found on the streets of New York City and wooden scraps from factories to create her assemblages, which are like sculptures.
Louise Nevelson, Royal Tide I (1960)
We looked at and discussed some examples of her work and students noticed that there are many different shapes that remind them of different things that they know in the real world, and that she also painted them all one color.
Louise Nevelson, Moon Star Zag VIII (1981)
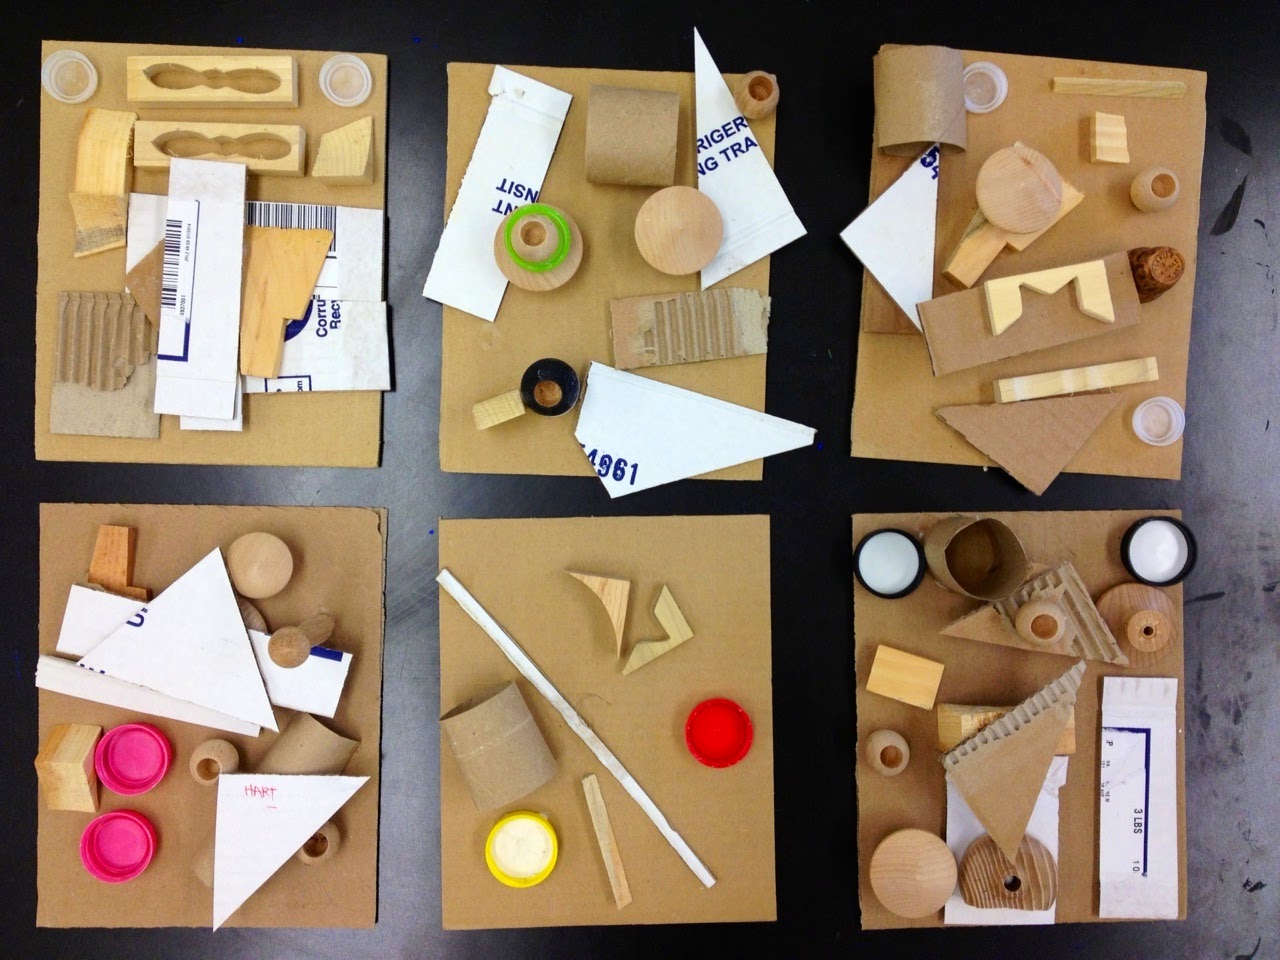
Students started with a rectangular piece of cardboard and selected a variety of different objects and materials to create their own assemblages. There were plastic bottle caps (thanks to all the families that brought them in!), cardboard shapes and scraps, as well as a variety of wooden pieces. Students could choose up to 2 bottle caps, 5 cardboard shapes, and 8 wooden pieces.
We used glue to help construct the assemblages. Students thought carefully about how to arrange their materials and considered how they might best fill up their space. Students also thought about layering materials on top of each other. 
 Here are some examples of our assemblages.
The following class, the assemblages had dried and were ready to be painted. We noticed that Nevelson painted her assemblages all one color, whether it was black, white or gold. We talked about why she chose to do this, and how this made it less distracting for the viewer and allowed textures and shapes to be the focus.
We chose one color to paint with and made sure to paint our entire assemblage, turning it around as we painted to make sure we got all the nooks and crannies! 
We also made sure to be gentle with the paint brush so materials would not fall off our assemblages. Here are some of the assemblages painted:


Some of our assemblages will be displayed in the glass case on the first floor near the lobby when all the classes are done painting, so keep your eye out for them soon!

Monday, April 27, 2015

Self Portraits from Observation

Many students had art class in their classrooms last month, due to state testing. Luckily, we were able to use the new standing self portrait mirrors recently gifted by the PTO. First, we talked about self portraits and how only you can make your self portrait (aka a selfie!). We noticed that everyone's eyes, noses and lips looked unique and different from one another. However, where they are located on our face is similar.

We measured the distance from the top of our head to our eyes, then shifted that down from our eyes to our chin. We noticed that this was around the same distance, since our eyes are actually in the middle of our head, not at the top. We also noted that the top of our ears are around the same point. And lastly, we took our hands and put them at the bottom of our ears and followed that down so we could feel the width of our neck. 
Then students set about drawing their self portrait from observation, using the new mirrors!
Students started with an oval shape for their head and drew a line across the middle and down the middle of this oval. These lines help provide guidelines for the placement of the eyes and ears, and also helped students to note the symmetry in their face.
Focusing on the shapes of their individual features, students looked closely at their eyes, noses and lips, as well as their ears and hair.
At the end of class, we shared what was most challenging part. Many students thought that the nose was the hardest feature to draw.
Gabriel, 2nd Grade

Cammy, 2nd Grade
Pirada, 2nd Grade
Aryman, 5th Grade
Gabby, 5th Grade
Erik, 5th Grade
Jasper, 5th Grade

Tuesday, April 21, 2015

Elizabeth Murray Inspired Shapes & Patterns

1st grade artists learned about the difference between geometric and organic shapes, after looking at a variety of different shapes. We then looked at the art of Elizabeth Murray, looking at and discussing her use of shapes.
Elizabeth Murray, Do the Dance (2005)
We noticed that Murray uses both geometric and organic shapes in her work, and her shapes and colors are fun and playful. They reminded students of a variety of different things -- from train tracks to a dog to the inside of our bodies! Students made many different connections to the artwork they saw.
Elizabeth Murray, Bop (2002-03)
After looking at Murray's work and reviewing shapes, students began by painting 2 geometric shapes and 3 organic shapes using black paint. The following class, we reviewed primary and secondary colors and also delved back into color mixing. Students painted their geometric shapes in primary colors and their organic shapes in secondary colors. They could choose any color or colors for the background.
The next week, students finished their paintings by adding interesting patterns, using a variety of repeating lines and shapes.
Students could also mix colors using black and white, so we explored pink and gray, among many other colors!
Here are some examples of our Elizabeth Murray inspired shape paintings: 
Kingston, 1st Grade
Ava, 1st Grade

Aiden, 1st Grade
Aysha, 1st Grade
Sawyer, 1st Grade