Showing posts with label Exploration. Show all posts

Thursday, February 7, 2019

Creative Color Mixing and Naming

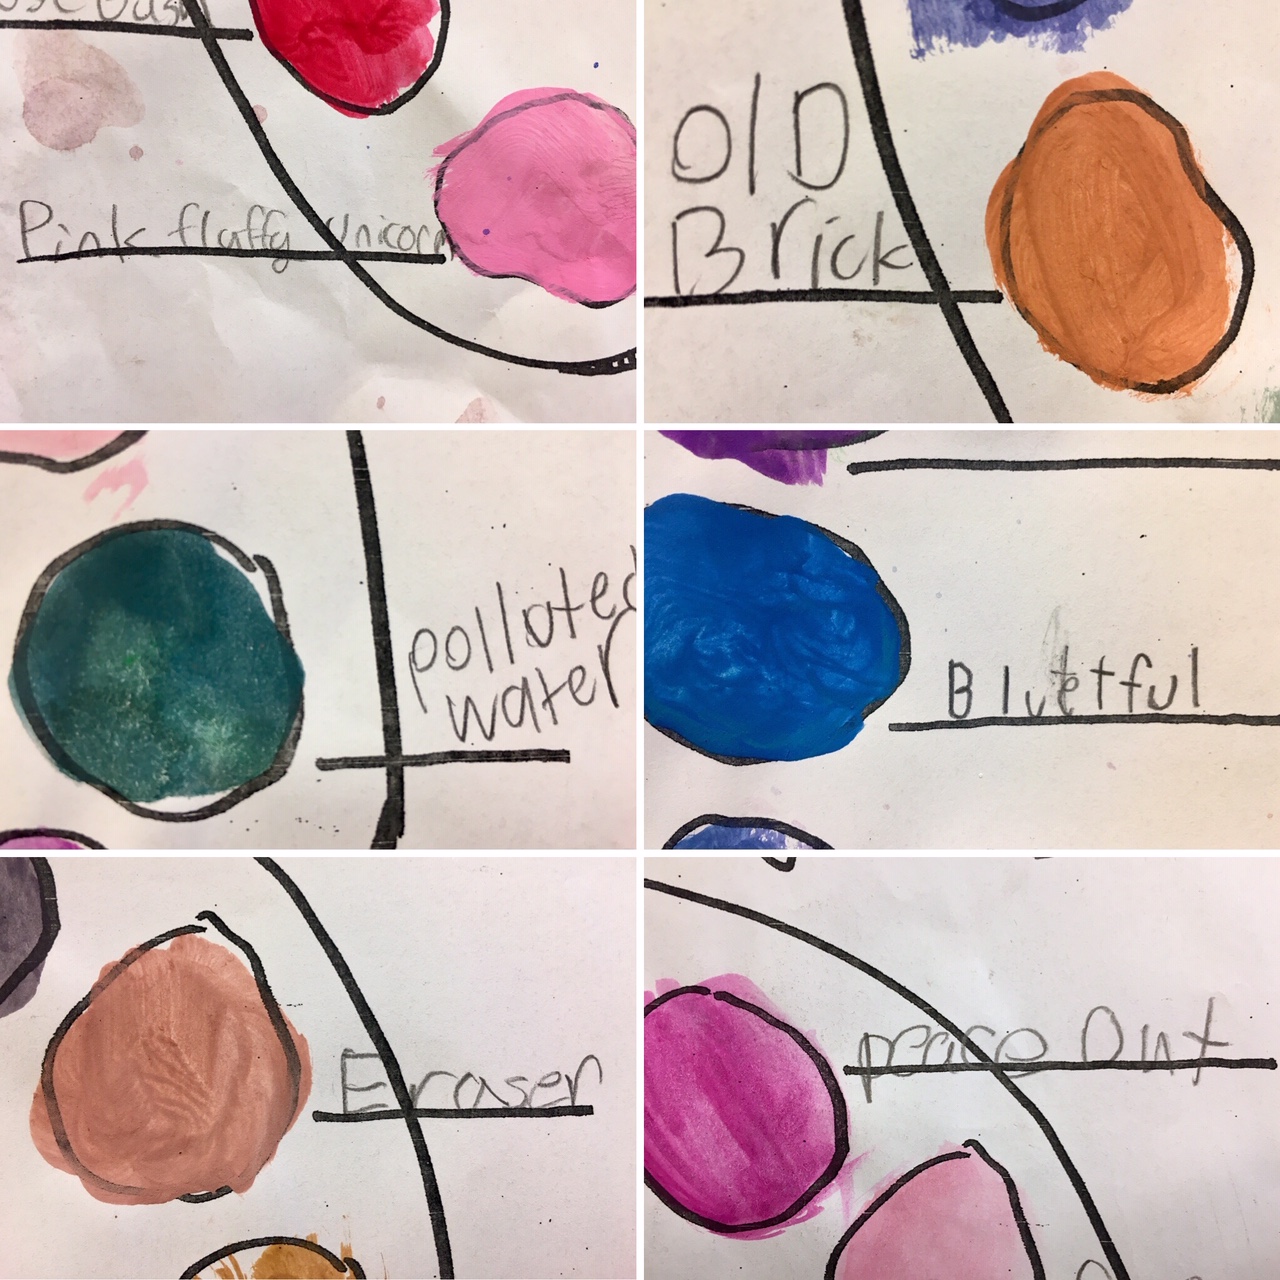
Artists in 3rd grade recently explored color mixing in preparation for an upcoming project! We mixed 10 different colors and also came up with a unique name for each color. 
First, students explored color mixing, trying to come up with 10 different colors for their palette. We discussed how you might try to create a color that you already have in mind, like a light green, or just see what happens if you mix a lot of white, a little blue, and some yellow. Since we had just painted a color wheel with primary, secondary and tertiary colors, students were familiar with which colors to mix together to get a wide range of colors. We also experimented with adding white and black to colors, noting how it made colors lighter or darker. 
The following class, students thought of creative names for each of the colors they had made. Instead of simply naming colors "light pink" or "dark blue," students were challenged to come up with creative names like "cherry blossom pink" and "storm blue." We looked at examples of paint chips and noticed that many names were inspired by animals, nature, food, and the weather. We made a list of things we might be inspired by for color naming and then named all of our colors. 
We shared our paint colors and corresponding names with partners and then with the whole class. A lot of students used alliteration, which is when you repeat the same letter at the beginning of your words, like "pig pink" and "grass green." Check out some of our creative color names below!


Tuesday, May 15, 2018

Monoprinting Explorations with Gelli Plates

This spring, 3rd grade artists experimented with monoprinting using Gelli plates. Gelli plates look and feel a lot like gelatin, but are reusable (and not edible!). We learned that in monoprinting, you make a one of a kind print, unlike other forms of printmaking, where you can print the same image multiple times. We explored a few different monoprinting techniques, focusing on one technique per class. 
On the first class, we learned about the subtractive method of monoprinting. Students connected this technique to subtraction in math, which means to remove or take away. Students watched a demonstration before trying it themselves. First, we rolled acrylic paint on top of the Gelli plate in an even layer with a brayer. Using cotton swabs, we removed, or subtracted, some of the paint from the plate before placing a piece of paper on top and pulling the print. We used them because we cannot use anything sharp on the Gelli plate's surface. Students experimented with different lines, shapes and symbols. We also noticed that everything we drew onto the plate came out backwards on the paper. The Gelli plates made monoprinting pretty easy! After each print, we used the brayers to roll more paint on top of the plate and start again. Each student made 3 subtractive monoprints, sharing a Gelli plate and brayer with a partner. At the end of class, one student washed the brayer and the other partner cleaned the Gelli plate. The Gelli plates are easy to clean with a little hand sanitizer and paper towel. 
The following class, we learned about and experimented with the additive method of monoprinting. The opposite of the subtractive technique, we added the paint directly on top of the Gelli plate. Students used paintbrushes to paint lines, shapes and designs on top of the plate before placing a piece of paper on top and pulling the print. We used scrap newsprint paper to remove any remaining paint between prints. Each student made 3 additive monoprints and shared the clean up responsibilities at the end of class. 
The third technique we learned about was masking. Masking is when you cover up part of the plate with a material so that it masks that area. We used paper shapes to cover up parts of the Gelli plate. 
We also experimented with layering as our fourth and final technique, printing on top of existing prints. For this technique, we also had to register, or line up our prints, with the one already on the paper. This was challenging, but we noticed that layering our prints together created some very interesting effects and new color combinations. 
After all of our monoprinting explorations, we looked at all of our prints and selected our three favorites to sign and title. Students had as many as 15 prints that they had made during all of our explorations! It was interesting to see prints we had made several classes ago. Students created a unique signature to sign all their prints and also spent time coming up with thoughtful and creative titles! 
We finished with a gallery walk to see everyone's favorite three prints, spending time to notice the monoprinting technique(s) that were used and reading the titles. Our creative titles added a lot to our understanding of the prints. Below are some examples of our monoprints:
Anastasia, 3rd Grade (Monfette)
Autumn, 3rd Grade (Monfette)
Boran, 3rd Grade (DeBaie Nickl)
Brian, 3rd Grade (Donato)
Charlotte, 3rd Grade (Fletcher)
Daria, 3rd Grade (Fletcher)
Ella, 3rd Grade (DeBaie Nickl)
Ellian, 3rd Grade (Monfette)
Mera, 3rd Grade (Donato)
Sophia, 3rd Grade (Monfette)
Viveca, 3rd Grade (Monfette)
Zaol, 3rd Grade (Monfette)

Friday, April 3, 2015

Exploring Texture Two Ways

Recently, PK artists have been learning about texture, or how something feels to touch. To further explore different textures, we made texture rubbings as well as texture prints!

We learned how to make a texture rubbing by placing an object underneath their paper and using the side of a crayon to rub on top of the paper to capture the object's texture. Students were given a variety of different objects at their table and experimented with texture rubbing. 
Students thought about where to place their objects underneath their paper so that they could fill up their whole paper, as well as layer some rubbings on top of each other. Here are some examples of our texture rubbing exploration:
Camden, PK
Katherine, PK
The following class, PK explored texture printing! We printed with cardboard earlier this school year but this time, students tried printing with a variety of different everyday objects and materials, as well as different colors of paint!

First, we reviewed how we make a print with an object: dip it in the paint, press it down on the paper, and lift up to reveal the print. Then students chose either a black or white piece of paper and started printing at their assigned table. Every few minutes, students moved to another table to print with different materials and paint colors. Everyday objects included sponges, forks, rubber bands, bubble wrap, toilet paper rolls, plastic mesh, spools and plastic caps. Prints were layered on top of each other as students moved around the room.
PK students did a great job with this messy process, making sure to put their objects back in the middle of the table and walking carefully to the next station with their artwork when it was time. It was pretty messy, but also a lot of fun!
Here are some examples of our texture printing exploration:
Calvin, PK
Eloise, PK
Ava, PK
Morgen, PK

Friday, January 30, 2015

Mixing and Naming Colors

Have you ever wondered whose job it is to name colors at Crayola? Or Benjamin Moore? Artists in 3rd grade mixed 10 different colors and also set about naming them, inspired by nature, food, and their surroundings. 
First, students explored color mixing, trying to come up with 10 different colors. Since we had done our color wheel with primary, secondary and tertiary colors recently, students were familiar with which colors to mix together to get a wide range of colors. We also experimented with adding white to this mix, and students were able to mix many different colors.

 
After they dried, we thought of creative names for each color. Instead of simply naming colors "blue" or "pink," students were challenged to come up with creative names like "ocean blue" and "bubble gum pink." 
Then we got partners by getting paint chips and having to find the person who got the same color. We shared our new paint colors with each other and shared our favorite color names. Some examples were names like "neon celery," "possessed pink," "patriots blue," and "scrambled eggs."
Check out some of our creative names for colors below!


Friday, December 12, 2014

Aboriginal Animal Dot Painting, Part 1

Artists in 4th and 5th grades have been learning about the dot paintings of the Aboriginal people of Australia. We looked at some examples of their paintings, which help tell the story of their lives and history. Aboriginal artists used different symbols to help tell their story in pictures, and also used colors that had cultural meaning.
We began our own dot paintings by selecting animals native to Australia and drawing and painting them as simple outlines on brown paper. We noticed that the Aboriginal artists flattened out their animals, often showing them from a bird's eye view, so we did the same. We also used different shades of brown paper to resemble the tree bark and rocks that the Aboriginal people painted on.
We spent a day exploring color mixing, so we could create a variety of different colors using just our primary colors as well as white, and refresh our color mixing minds. 

We then painted our animals, using at least 5 colors that we mixed. We added dots by using a very special tool -- a q-tip! We thought about how we could use color to create a pattern with the dots. 
Painting took a few classes, so during one of them we learned about an Aboriginal instrument called the didgeridoo, which is a wind instrument developed by the Aboriginal people around 1,500 years ago and is still used today. Traditionally it was made out of wood that was hollowed out by termites and beeswax was used to form a mouthpiece. 

We looked at one owned by Ms. Patashnick, the music teacher, that was made from a PVC pipe and we noticed it also had a pattern of dots painted on the outside. We watched a video of someone playing didgeridoo and noticed that different sounds are produced by different ways of breathing into the instrument, since there are no holes or keys. We have been listening to didgeridoo music as we paint.
Lena, 5th Grade
Check back soon to see updates on our finished Aboriginal animal dot paintings!

Thursday, December 4, 2014

Exploring Color Mixing

This past week, artists in PK and Kindergarten have been exploring color. We were familiar with our primary colors and had been using them for previous artwork, including our Mondrian inspired collages and our shape robots:
David, Kindergarten
We also painted lines and shapes using black paint and added our primary colors, being careful to wash out our brush between colors so they did not mix.
Our primary colored work is currently featured on the bulletin board:
This week we began to explore secondary colors, which are made by mixing the primary colors together. We thought about what might happen when we mix 2 primary colors together. We experimented with mixing our primary colors to make orange, green and violet. We made guesses as to what color might result when we mixed 2 colors together and we were excited when we were right!

After exploring color mixing together as a class, and thinking of different things that are orange, green or violet in color, we began our own exploration and experimentation!
We mixed red and yellow to make orange, blue and yellow to make green, and blue and red to make violet. We thought about how to make a darker color and a lighter color. Some of us tried to mix all 3 primary colors together and discovered that it made brown! 
Duncan, Kindergarten
Calvin, Kindergarten
Mera, Kindergarten
Next class we will be learning even more about our secondary colors!