Sunday, April 30, 2017

Texture Printing

Recently, PK and Kindergarten artists have been exploring texture, or how something feels to touch. After texture rubbing, we explored texture printing. We have already printed with cardboard earlier this school year, with our printed cityscapes. This time, students tried printing with a variety of different everyday objects and materials, as well as different colors of paint! 
First, we reviewed how we make a print with an object: dip it in the paint, press it down on the paper, and lift up to reveal the print. We talked about how to leave some space on the paper, so that there would be enough room to visit all 6 different color stations. 
Then students started printing at their assigned table, with one color of paint. Every few minutes, students moved to another table with their group to print with different materials and colors. Objects included sponges, bubble wrap, cardboard paper rolls, plastic mesh, and various plastic caps and lids. Prints were layered on top of each other as students moved around the room. 
Students were encouraged to explore and experiment with their prints and use the entire paper. PK and Kindergarten students did a great job with this messy process, making sure to put their objects back in the center of the table for others to share and walking carefully to the next station with their artwork when it was time to switch. It was messy, but also a lot of fun! Here are some examples of our texture printing exploration:
Marlo, Kindergarten (Segreve)
Noah, Kindergarten (Bolton)
Seif, Kindergarten (Beatty)
Susie, PK (Mattson)
Yaseen, Kindergarten (Martignetti)
Lara, Kindergarten (Martignetti)
Lucy, Kindergarten (Beatty)

Wednesday, April 26, 2017

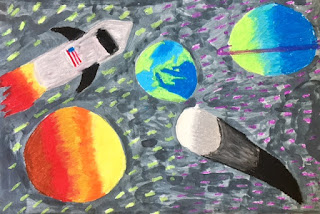
Out of This World Outer Space Resist

Recently, 4th grade artists thought about how to use color to make shapes appear less flat and more three dimensional. We noticed that adding shading to a shape, as well as a highlight, helps transform the flat shape into a three dimensional looking form. 
We applied this concept to our outer space drawings, using oil pastels. To begin, students brainstormed a list of things you might see in outer space, including the Earth, sun, planets, stars, asteroids, space stations and of course, the Millennium Falcon and Death Star from Star Wars! After sketching out their compositions, students drew their outer space scenes on larger paper and used oil pastel to add color and depth.  
Students were encouraged to use several colors on each object, considering the light source and where there might be shade to help give objects and three dimensional appearance. Students got very creative and imaginative with their details, including flying unicorns, food items, and space junk!
When they finished drawing with oil pastel, students painted their entire artwork with black watercolor paint. This is called resist, because the oil pastel resists the watercolor paint, and allows the oil pastel outer space objects to stand out. Here are some examples of our out of this world outer space resist paintings!
Nolan, 4th Grade (Dubuque)
Alani, 4th Grade (Graves)
Andrew A., 4th Grade (Mattson)
Anna, 4th Grade (Cikacz)
Ava, 4th Grade (Mattson)
Bella, 4th Grade (Cikacz)
Emilio, 4th Grade (Dubuque)
Hammad, 4th Grade (Dubuque)
Jaylyn, 4th Grade (Dubuque)
Jessica, 4th Grade (Cikacz)
Kiran, 4th Grade (Mattson)
Oliver, 4th Grade (Doherty)


Monday, April 24, 2017

Self Portrait Assemblages

Last month, Kindergarten artists created self portrait assemblages! We learned that a self portrait is when a you create an artwork, like a drawing or painting, of yourself. Only you can create your own self portrait. We also thought about what our bodies look like when we are doing our favorite physical activities. We shared ideas by having students act out different activities to see what their bodies look like when they are running, jumping, dancing, swimming, practicing ballet, doing karate, playing hockey and more. 
Next, students used cut cardboard shapes and glued them together to create their bodies, arranging their arms and legs to show what their bodies look like when they are doing their favorite activities. 
During the following class, we added clothing to our self portrait assemblages. There were many different materials to choose from at the materials table, including paper, fabric, metallic paper, felt, foam and buttons. 
Students chose different materials to add to their self portrait to give their clothing different colors, patterns and textures. Many students thought about what kind of clothing they wear during their favorite activity, to help select materials. Some students wear a uniform or special outfit for their activity, such as karate or gymnastics. 
During our last class, we discussed the different parts of our face and students added their facial features, as well as their hair. Students chose different colors of paper for their skin tone, since we all have different skin colors. Students could add their facial features using paper or draw them with pencil and Sharpie markers. Students added yarn for hair, choosing colors that were closest to their hair color. 
After everyone was done, we shared our self portrait assemblages with the class. We noticed that there were such a wide variety of activities represented! We also worked on being respectful of each other's work. Here are some examples of our self portrait assemblages:
Amelia, Kindergarten (Martignetti)
"Ballet"
Brianna, Kindergarten (Segreve)
"Playing basketball"


Hailey, Kindergarten (Segreve)
"Sliding down the slide"
Kenji, Kindergarten (Segreve)
"Running"
Kiana, Kindergarten (Blackwood)
"Dancing"
Magdalena, Kindergarten (Segreve)
"Gymnastics"
Virgil, Kindergarten (Martignetti)
"Playing hockey"
Wilson, Kindergarten (Martignetti)
"Ice skating"
Joshua, Kindergarten (Blackwood)
"Playing football"
Audrey L., Kindergarten (Bolton)
"Jumping rope"
Zoie, Kindergarten (Bolton)
"Jumping"

Thursday, April 13, 2017

Happy Spring Break!

Happy Spring Break! I hope everyone has a great April vacation! See you back in art in 2 weeks!

Friday, April 7, 2017

Mandalas, Part 2

Recently, 1st grade artists learned about the mandala and created collaborative mandalas using a variety of different materials. The following class, students began designing their own mandala drawings using a theme that expressed their interests and personalities. Some examples of themes that students chose were nature, shapes, sports, seasons and outer space
Using rulers to help find the center point, students began designing their mandala starting from the middle and going outwards. We thought about how to make our design repeat in a radially symmetrical way, so that each section of our circle repeated all the way around. Many students found it easier to turn or spin their mandala as they worked, to help repeat their design in a radially symmetrical way.  
Once they were done with their pencil design, they outlined the design in Sharpie marker and colored them in, thinking about how to create patterns using color, as well.
Students worked hard to make their colors bright and cover the white paper. Once they were finished, students cut out the circle and glued it onto a background, considering what kinds of colors would complement their mandala design. Here are some examples of our finished mandalas:  
Olivia, 1st Grade (Salvucci)
Samuel, 1st Grade (Mandile)
Tyler, 1st Grade (Massa)
Caden, 1st Grade (Mandile)
Calvin, 1st Grade (Torchio)
Carson, 1st Grade (Torchio)
Jayden, 1st Grade (Mandile)
Kaiwan, 1st Grade (Mandile)
Leila, 1st Grade (Torchio)
Maya, 1st Grade (Massa)
Norah, 1st Grade (Mandile)
Stephanie, 1st Grade (Landay)